Posts tagged Web Development

How to Webscrape Images from HTML: A Developer’s Guide (Without Getting Blocked 🚫)

Hey folks! 👋 Sharih Hassan back at it again—your code-cracking buddy from SharihHassan.com. Last time, we tackled how to prevent Angular from returning HTML when you wanted JSON. Today? We’re going rogue: how to webscrape images from HTML without ending up on a website’s naughty list. Buckle up, and let’s do this ethically (and hilariously).


Why Webscrape Images? (And Why It’s Like Walking a Tightrope 🎪)

Webscraping images is like sneaking cookies from the cookie jar 🍪—everyone does it, but you gotta be smooth. Maybe you’re building a meme archive, training an AI, or just really into cat pictures 🐈. But scrape carelessly, and you’ll get blocked faster than a pop-up ad in 2005.


Step 1: Inspect the HTML—Be a Detective 🕵️♀️

Right-click any webpage, hit “Inspect,” and you’ll see HTML tags laughing at you. Images usually live inside <img> tags with src attributes. Your mission? Extract those src URLs like a pro.

html

<!-- Example: A very serious cat image -->  
<img src="https://website.com/cat-in-a-suit.jpg" alt="Business Cat">  

Run HTML


Step 2: Use JavaScript (But Don’t Be a Script Kiddie)

For static sites, Cheerio (a lightweight jQuery-like library) is your BFF. For dynamic sites, Puppeteer (a headless browser) will pretend to be a human. Here’s a sneak attack:

JavaScript

// Puppeteer example: Scrape images like a ninja  
const puppeteer = require('puppeteer');  

(async () => {  
  const browser = await puppeteer.launch();  
  const page = await browser.newPage();  
  await page.goto('https://example.com');  

  const images = await page.$$eval('img', imgs =>  
    imgs.map(img => img.src)  
  );  

  console.log("🕶️ Here’s your loot:", images);  
  await browser.close();  
})();  

Pro Tip: Always check a site’s robots.txt first. Ignoring it is like ignoring a “Beware of Dog” sign 🐕.


Step 3: Filter & Download Responsibly 🌱

Not all images are created equal. Filter out logos, icons, or anything with alt="annoying-ad". Use Node.js’s fs module or Python’s requests to download them.

JavaScript

// Filter only high-res cat pics (priorities, people)  
const catImages = images.filter(src =>  
  src.includes('cat') && !src.includes('thumbnail')  
);  

Step 4: Avoid Getting Blocked (AKA Don’t Be a Greedy Goblin)

Websites hate scrapers that hit them 100 times/second. Add delays, rotate user agents, and use proxies. Or just… don’t be a bot 🤖.

JavaScript

// Puppeteer with a polite delay  
await page.waitForTimeout(3000); // 3 seconds = good karma  

Step 5: Ethical Stuff (Because We’re Not Villains)

  • Respect copyrights: Don’t scrape Unsplash and sell the pics as NFTs.
  • Credit creators: If you use ’em, link back.
  • Rate limits: Treat websites like a buffet—take one plate at a time.

Final Thoughts: Scrape Smart, Not Hard 💡

Webscraping images is powerful, but with great power comes great “why is my IP banned?” energy. Use tools wisely, respect website rules, and maybe leave a virtual thank-you note 💌.

And hey, if you’re still wrestling with HTML in Angular, revisit my guide on preventing HTML responses in Angular. Because nobody wants JSON dressed as HTML!

Got scraping horror stories? Share ’em on the blog! Catch you in the next post.
Sharih Hassan ✌️

How to Prevent Returning HTML in Angular: A Developer’s Guide (Without Losing Your Sanity 😱)

Hey there, fellow coders! 👋 Sharih Hassan here—your friendly neighborhood developer and blogger at SharihHassan.com. Today, we’re tackling a quirky little problem that’s haunted many Angular devs: how to stop your app from returning HTML when you specifically asked for JSON. Let’s turn that frustration into action—and maybe share a laugh along the way.


Wait, Why Am I Getting HTML Instead of Data? 🤔

Picture this: You’re happily coding an Angular app, sipping coffee ☕, and suddenly your API call returns… an entire HTML page instead of that sweet, sweet JSON. It’s like ordering a latte and getting a cactus 🌵. Not cool.

This usually happens when:

  • Your API endpoint is misconfigured (oops).
  • The server throws an error (like a 404 or 500) and dumps HTML instead of JSON.
  • You’ve accidentally called the wrong URL (been there, done that 💁♂️).

But fear not! Let’s fix this faster than you can say, “Why is my app rendering a 404 page?!”


Step 1: Check Your Endpoints (No, Seriously)

First, channel your inner detective 🕵️♂️. Did you typo the API URL? Check your environment.ts file or wherever you store endpoints. A misplaced / can turn your data fetch into a wild goose chase.

Typescript

// environment.ts  
export const environment = {  
  production: false,  
  apiUrl: 'https://your-api.com/data' // Not 'https://your-api.com/data/' 🙅♂️  
};  

Pro tip: Use Angular’s HttpClient with error handling to catch these gremlins early:

Typescript

getData() {  
  return this.http.get(environment.apiUrl).pipe(  
    catchError((error) => {  
      console.log("Hey, why is there HTML here?! 🔍", error);  
      throw error;  
    })  
  );  
}  

Step 2: Forcefully Reject HTML Responses

Sometimes, servers get too helpful and return HTML even on errors. To avoid this, explicitly ask for JSON in your HTTP headers:

Typescript

getData() {  
  const headers = new HttpHeaders({  
    'Accept': 'application/json' // "I said JSON, please!" 📢  
  });  
  return this.http.get(environment.apiUrl, { headers });  
}  

If the server still sends HTML, it’s time to yell at your backend team. Politely, of course. 😇


Step 3: Validate Responses Like a Bouncer 🚧

Don’t trust strangers—even your API. Use Angular’s interceptors to validate responses before they wreak havoc:

Typescript

intercept(req: HttpRequest<any>, next: HttpHandler): Observable<HttpEvent<any>> {  
  return next.handle(req).pipe(  
    filter(event => event instanceof HttpResponse),  
    map((event: HttpResponse<any>) => {  
      if (event.headers.get('Content-Type')?.includes('text/html')) {  
        throw new Error('HTML detected! Abort! Abort! 🚨');  
      }  
      return event;  
    })  
  );  
}  

Now your app will block HTML at the door like an overzealous nightclub bouncer.


Step 4: Handle Errors Gracefully (Because Stuff Happens)

Even with precautions, errors happen. Maybe the server is down, or a cat walked on the keyboard 🐱💻. Use Angular’s error handling to show friendly messages instead of raw HTML:

Typescript

this.dataService.getData().subscribe({  
  next: (data) => this.showData(data),  
  error: (err) => {  
    this.displayError("Oops! Our hamsters took a break. 🐹 Try again later!");  
  }  
});  

Step 5: Server-Side Fixes (Because Teamwork Makes the Dream Work)

If you control the backend, ensure it never returns HTML for API routes. For example, in Node.js/Express:

Javascript

app.use('/api', (req, res, next) => {  
  res.status(404).json({ error: 'Not Found' }); // Not res.sendFile('404.html')!  
});  

Final Thoughts: Keep Calm and Code On 💪

Returning HTML instead of JSON is like getting socks for Christmas—unexpected and mildly infuriating. But with proper error handling, headers, and teamwork, you’ll squash this bug faster than you can say, “Where’s my data?!”

By the way, if you’re into quirky JavaScript hacks, check out my previous article on How to Simulate Keyboard Typing in the JavaScript Console. It’s a fun little trick that’ll make you feel like a coding wizard 🧙‍♂️.

Catch you in the next post!
– Sharih Hassan ✌️

HTML & CSS Basics: Building Your First Webpage

Hey there, future web wizard! 🧙‍♂️ Ready to embark on the magical journey of creating your very first webpage? Don’t worry; we’ve all been there—staring at the screen, wondering if “HTML” is a new texting acronym the kids are using these days. 😂 But fear not! By the end of this guide, you’ll not only know what HTML and CSS stand for but also how to use them to craft a simple yet stunning webpage. Let’s dive in!

What Are HTML and CSS? 🤔

Before we get our hands dirty with code (not literally, unless your keyboard needs cleaning), let’s break down these two fundamental building blocks of the web:

  • HTML (HyperText Markup Language): Think of HTML as the skeleton of your webpage. It structures the content, telling the browser, “Hey, this is a heading,” or “This is a paragraph.” Without HTML, your webpage would be like a house without a frame—just a pile of stuff. 🏠
  • CSS (Cascading Style Sheets): If HTML is the skeleton, then CSS is the wardrobe and makeup. It styles your webpage, adding colors, fonts, and layouts, making everything look fabulous. Imagine showing up to a party in your pajamas; that’s HTML without CSS. 😅

Setting Up Your First Webpage 🖥️

Alright, let’s get to the fun part—building your first webpage! Follow these steps, and you’ll have something to show off in no time.

1. Create a New HTML File 📄

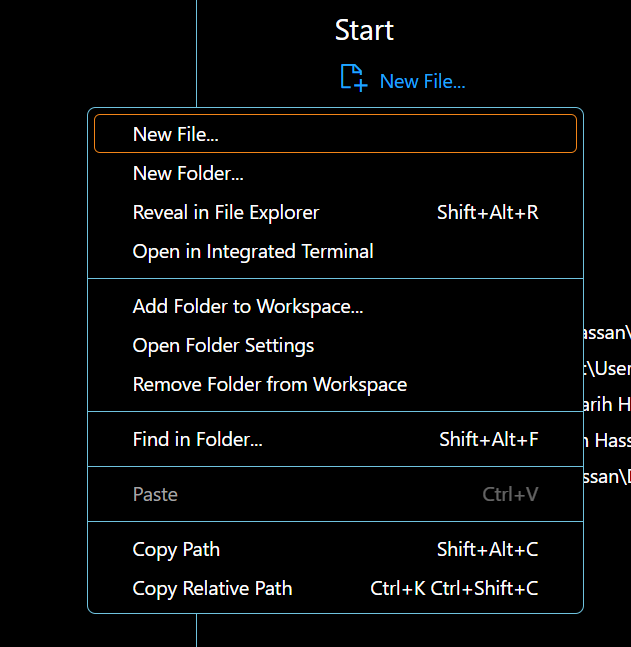
Open your favorite text editor (Notepad, VS Code, or even the old-school Notepad++). Create a new file and save it as index.html. The .html extension tells your computer that this is an HTML file.

A Screen shot of creating index.html file in Visual Studio Code.
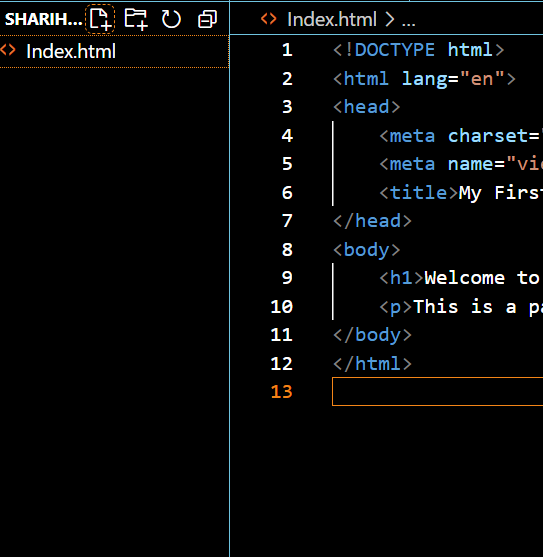
A Screen short of file created showing index.html and and added code of html in visual studio code.

2. Add the Basic HTML Structure 🏗️

In your index.html file, type the following:


<!DOCTYPE html>
<html lang="en">
<head>
    <meta charset="UTF-8">
    <meta name="viewport" content="width=device-width, initial-scale=1.0">
    <title>My First Webpage</title>
</head>
<body>
    <h1>Welcome to My First Webpage!</h1>
    <p>This is a paragraph of text on my awesome new webpage.</p>
</body>

</html>

Let’s break this down:

  • <!DOCTYPE html>: This line tells the browser, “Hey, I’m using HTML5!” It’s like the secret handshake of web development. 🤝
  • <html lang="en">: This tag wraps all your HTML content and sets the language to English.
  • <head>: Contains meta-information about your webpage, like the title and character set.
  • <title>: The text that appears on the browser tab. Make it snappy!
  • <body>: This is where all the visible content of your webpage goes.

3. Style It Up with CSS 🎨

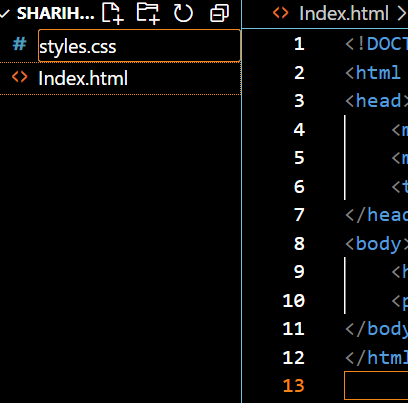
Now, let’s add some style to your page. Create a new file in the same directory and save it as styles.css. In this file, type:

An Image of Creating Styles.css File on Visual Studio Code.
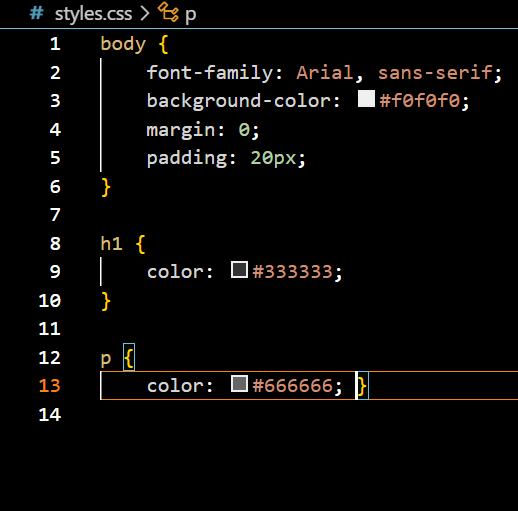
An Image of Created Styles.css file and added css code.

body {
    font-family: Arial, sans-serif;
    background-color: #f0f0f0;
    margin: 0;
    padding: 20px;
}

h1 {
    color: #333333;
}

p {
    color: #666666;
}

This CSS will give your webpage a clean, modern look. But wait, how does your HTML know about this CSS? Good question!

4. Link CSS to HTML 🔗

Go back to your index.html file and modify the <head> section to include a link to your CSS file:


<head>
    <meta charset="UTF-8">
    <meta name="viewport" content="width=device-width, initial-scale=1.0">
    <title>My First Webpage</title>
    <link rel="stylesheet" href="styles.css">
</head>

This <link> tag tells the HTML, “Hey, use these styles for the page.” It’s like hiring a decorator for your house. 🖌️

5. View Your Masterpiece 🖼️

Save both files and open index.html in your web browser. Voilà! You’ve just created your first webpage. Take a moment to bask in the glory. 🌟

Next Steps 🚀

Congratulations on building your first webpage! But don’t stop here. The world of web development is vast and exciting. Here are some next steps to consider:

  • Learn More HTML & CSS: There are tons of resources online to deepen your knowledge. Check out tutorials, courses, and documentation to expand your skills.
  • Explore JavaScript: Once you’re comfortable with HTML and CSS, dive into JavaScript to add interactivity to your webpages. It’s like adding a dash of magic to your creations. ✨
  • Build Projects: Practice makes perfect. Start small by building personal projects like a portfolio site or a blog. The more you code, the better you’ll get.

I’ve written an article that will help you get started: The Ultimate Beginner’s Guide to Web Development.

Call-to-Action 📢

Feeling excited about your journey into web development? Share your first webpage with friends and family to showcase your new skills. And if you’re hungry for more knowledge, explore additional resources and tutorials to continue your learning adventure.

Happy coding! 😊

The Tech Behind Building an E-Commerce Website 🔧

Have you ever wondered what makes an e-commerce website tick? How do online stores stay up and running 24/7, handle thousands of orders a minute, and keep customers clicking without a hitch? Well, buckle up! 🏎️ In today’s article, we’re diving into the technology infrastructure that powers e-commerce. And trust me, it’s not just about flashy product images and smooth checkouts. There’s a lot happening behind the scenes!

Whether you’re thinking about launching your own online store, looking to optimize an existing one, or just curious about what keeps e-commerce afloat, you’ve come to the right place. By the end of this read, you’ll have a solid understanding of how e-commerce technology works and why it’s the secret sauce for online business success. Let’s break it down! 🔧✨

1. The Building Blocks of an E-Commerce Website 🏗️

First things first: What’s inside an e-commerce website? Well, it’s more than just the homepage you see when you land on a site. There’s a lot going on behind the curtain. Let’s pull it back and take a look:

  • Website Structure: Think of your e-commerce site as a digital mall 🏬. It’s got various departments, and each part plays a key role. The main ones are:
    • Homepage: This is the welcome mat of your store! It should be eye-catching, easy to navigate, and drive customers to what they want to buy. A slow or cluttered homepage? That’s a fast ticket to a high bounce rate 🚪💨.
    • Product Pages: This is where the magic happens. Clear product images, detailed descriptions, reviews, and an easy way to add items to the cart are essential for conversions. After all, you want your customers to click “Add to Cart,” not “Exit”!
    • Checkout Process: The checkout process is like the final lap of a race. You’ve done everything to attract the customer, now don’t let them trip at the finish line. Simplify the checkout form, offer guest checkouts, and show clear shipping costs upfront—trust me, your customers will thank you.
    • Customer Accounts: Some customers love creating an account so they can track orders, save preferences, and get personalized recommendations. For others, not so much. Keep it optional, but definitely convenient.
  • UX/UI: The Unsung Heroes of E-Commerce: Now let’s talk about the user experience (UX) and user interface (UI). These are the parts of your website that your customers will interact with the most. A poorly designed site can turn a dream shopper into a frustrated quitter. It’s like trying to navigate a shopping mall with a blindfold on. UX is how it feels, and UI is how it looks. Keep them both in check, and watch those conversions soar!

2. Legal Aspects: Yes, You Have to Follow the Rules 📜

Okay, here’s a less fun but equally important part of e-commerce: the legal stuff. And no, we’re not just talking about the terms and conditions no one reads! 🚨 Every e-commerce site has to comply with certain rules and regulations, especially if you’re handling sensitive customer data. Let’s break it down:

  • GDPR Compliance: If you’re dealing with customers from the European Union 🇪🇺, you better be familiar with GDPR (General Data Protection Regulation). This rule is all about customer data privacy. You need to:
    • Get explicit consent to collect data (no more “we’ll just take your email address without asking” situations).
    • Allow users to request, modify, or delete their data. Just like giving someone the keys to their own storage unit!
    • Be crystal clear about how their data will be used—don’t leave them guessing like they’re reading a mystery novel.
  • Taxes: Ah, taxes. A joy for every e-commerce business owner! 🧾 Depending on where you’re selling, you’ll need to collect sales tax or VAT. Make sure your checkout process calculates taxes automatically based on the customer’s location. A heads-up: tax laws are tricky, so consulting a tax professional might save you from some legal headaches.
  • Consumer Protection Laws: It’s not all about data—customers also have rights! Consumer protection laws ensure that buyers can get refunds or replacements if they receive damaged goods. So, make sure your returns policy is clear and straightforward.

3. Internet Infrastructure: The Unsung Hero of E-Commerce 🌐

Behind every smooth-running e-commerce site is a network of internet infrastructure that makes it all possible. Without this, your site wouldn’t load, products wouldn’t display, and customers would probably give up and go somewhere else. Here’s what makes it work:

  • Key Web Technologies:
    • HTTP/HTTPS: When a customer visits your site, their browser uses HTTP (HyperText Transfer Protocol) to communicate with your server. HTTPS (the ‘S’ stands for secure) ensures that this data is encrypted. So when customers enter their credit card info, it’s safe from prying eyes 👀💳.
    • HTML: The backbone of every webpage! Without HTML (HyperText Markup Language), your products would just be a bunch of text and links with no design. Think of HTML as the skeleton, and the CSS as the skin!
    • DNS (Domain Name System): DNS is like the internet’s phonebook. When someone types “www.yourstore.com,” DNS translates that into a series of numbers (IP address) so computers can talk to each other. The faster the DNS, the faster your site loads. Every second counts! ⏱️
  • Cloud Computing: Scaling Your E-Commerce Business: Imagine this: your store experiences a huge spike in traffic because of a viral promotion or Black Friday deals 🛍️. If you’re using traditional server infrastructure, your website might crash under the pressure. Cloud computing to the rescue! ☁️ Services like Amazon Web Services (AWS) or Google Cloud can automatically scale your resources based on demand. This means you won’t have to worry about downtime during your busiest days.

4. Optimizing for Speed and Performance ⚡

Let’s face it: No one likes a slow website. In fact, 47% of users expect a webpage to load in 2 seconds or less. If your site takes longer, you’re losing customers—simple as that. 🏃‍♀️💨

  • Caching and CDNs (Content Delivery Networks): CDNs spread your website’s content across multiple servers around the world, so users can access it faster. It’s like putting your store in several locations, reducing delivery times.
  • Performance Tools: Use tools like Google PageSpeed Insights to check your site’s performance. If your site is slow, you may need to optimize images, streamline code, or improve your hosting. Every second you save can boost your conversions.

5. Future-Proofing Your E-Commerce Store: Trends to Watch 🔮

So, what’s next? What should you be looking out for to stay ahead in the ever-evolving world of e-commerce? Here are a few trends that are shaping the future:

  • Artificial Intelligence (AI): AI is revolutionizing the shopping experience. Whether it’s personalized recommendations or chatbots providing 24/7 customer service, AI is making e-commerce smarter. Think of it as your store’s brain 🧠, analyzing data and predicting customer behavior.
  • Augmented Reality (AR): Imagine being able to virtually “try on” clothes or see how a piece of furniture looks in your living room before buying it. AR is transforming how we shop online, and it’s here to stay.
  • Voice Commerce: With smart speakers like Amazon Alexa and Google Assistant, voice shopping is on the rise. You can now order a pizza or buy a pair of shoes just by speaking to your device. How cool is that? 🗣️🍕

Conclusion: The Tech That Powers Your Online Business 💪

There you have it! The technology infrastructure behind e-commerce isn’t as complicated as it seems once you break it down. From seamless checkout processes and secure customer data management to cloud computing and future technologies like AI and AR, all of these components work together to create the best possible experience for your customers.

So, whether you’re just getting started or looking to optimize your current e-commerce setup, make sure you have a solid tech foundation. After all, your online business’s success depends on it!

If you haven’t already, you might also want to check out our previous article on E-Commerce Business Strategies, where we discuss the key strategies that can boost your e-commerce sales and grow your online business.

Ready to Build or Optimize Your E-Commerce Store? 🚀

Don’t wait until your website crashes under pressure! Start today by reviewing your technology infrastructure, ensuring compliance, and optimizing for performance. Stay tuned for more tips and trends to help you build the best e-commerce business on the block!